Forecasts in Snowflake: Facebook Prophet on Cloud Run with SQL
By creating a Snowflake external function we can get predictions out of Facebook Prophet for any time series. Learn how to easily integrate these forecasts into your SQL pipelines — with Snowflake connecting to Prophet running on a Docker container inside Google Cloud Run.

2022–09 update
Facebook Prophet now runs inside Snowflake, without the need of external functions.
Goals
The goal for this post is to build a function you could use within Snowflake to forecast time series. A great open source tool for this is Facebook Prophet, and we just need a way to use it within our Snowflake environment. This is easy, with Snowflake’s ability to run external functions — hence we only need to host an instance of Prophet and add the necessary plumbing to end up with a prophetize(timeseries) function within Snowflake.
Let’s start with a demo, any time series in Snowflake will do: For example, the temperature around New York City in the Newark airport since 2018:
select date, temp
from noaa_gsod
where country_fips='US'
and station = 'NEWARK LIBERTY INTERNATIONAL AP';-- TODO: Show how to get NOAA GSOD from Knoema in a future post.

Then we can call our function prophetize() (see below how to create it) by aggregating the previous time series into an array with dates and values:
select prophetize(array_construct(
        array_agg(temp::float)
          within group(order by date)
        , array_agg(date::date)
          within group(order by date))::string) str
from table(result_scan(last_query_id(-1)));
And that’s it. What we get back is an array with predictions. An easy way to visualize these results is to combine the values of the previous two queries:
select date, temp::float avg_temp
    , 0 forecast, 0 fore_min, 0 fore_max
from table(result_scan(last_query_id(-2)))
union all
select x.value[0]::date, 0, x.value[1]::int forecast, x.value[2]::int fore_min, x.value[3]::int fore_max
from table(result_scan(last_query_id(-1))) a, table(flatten(a.$1)) x;
Interesting notes on the above:
- Prophet was able to easily detect seasonal patterns and predict future values.
- A lot of how Prophet works is tunable, but what you get out of the box works too.
- On Snowflake I used
last_query_id(-1)andlast_query_id(-2)to combine the results of the previous two queries. It’s a nifty feature.
Now let’s check the details on how to connect a function in the Snowflake SQL world prophetize() to Facebook Prophet running on Cloud Run.
How to
Deploy Prophet on a container to Cloud Run
The requirements.txt to build this container are straightforward:
flask==1.1.4
requests==2.25.1
gunicorn==20.1.0
pandas==1.2.4
pystan==2.19.1.1  # <3.0
fbprophet==0.7.1
As the Dockerfile:
FROM python:3.8# Allow statements and log messages to immediately appear in the Cloud Run logs
ENV PYTHONUNBUFFERED TrueCOPY requirements.txt .
RUN pip install -r requirements.txtENV APP_HOME /app
WORKDIR $APP_HOME
COPY main.py ./CMD exec gunicorn --bind :$PORT --workers 1 --threads 1 --timeout 0 main:app
And this is main.py, a basic web server that parses incoming arrays into a dataframe that Prophet uses to forecast an arbitrary number of periods. Then it returns a serialized array with a forecast and uncertainty intervals that Snowflake will receive:
import json
import logging
import osfrom fbprophet import Prophet
from flask import Flask, request
import pandas as pdlog = logging.getLogger()
app = Flask(__name__)def forecast(df: pd.DataFrame, periods=365) -> pd.DataFrame:
    df["ds"] = pd.to_datetime(df["ds"])    model = Prophet()
    model.fit(df)    future_df = model.make_future_dataframe(
      periods=periods, include_history=False)    return model.predict(future_df)[["ds", "yhat", "yhat_lower", "yhat_upper"]]@app.route("/", methods=["POST"])
def index():
    payload = request.get_json()
    logging.info(payload)
    # https://docs.snowflake.com/en/sql-reference/external-functions-data-format.html    rows = payload["data"]
    return_value = []
    for row in rows:
        row_number = row[0]
        function_input = json.loads(row[1])
        df = pd.DataFrame({'ds': function_input[1], 'y': function_input[0]})
        fc = forecast(df)
        fc['ds'] = fc['ds'].dt.strftime('%Y-%m-%d')
        row_to_return = [row_number, fc.to_numpy().tolist()]
        return_value.append(row_to_return)    json_compatible_string_to_return = json.dumps({"data": return_value})
    return (json_compatible_string_to_return)if __name__ == "__main__":
    app.run(debug=True, host="0.0.0.0", port=int(os.environ.get("PORT", 8080)))
If we want to build and run this container on Google Cloud run, we need to run:
gcloud builds submit --config cloudbuild.yaml;
gcloud run deploy --image gcr.io/fhoffa/prophetize --platform managed
Building the image on Cloud Build is slow the first time, as it takes time to compile Prophet — but this cloudbuild.yaml makes it fast with an image cache on further builds:
steps:
- name: 'gcr.io/cloud-builders/docker'
  entrypoint: 'bash'
  args:
  - '-c'
  - |
    docker pull gcr.io/fhoffa/prophetize:latest || exit 0- name: 'gcr.io/cloud-builders/docker'
  args: [
          'build',
          '--cache-from', 'gcr.io/fhoffa/prophetize:latest',
          '-t', 'gcr.io/fhoffa/prophetize:latest',
          '.'
        ]images: ['gcr.io/fhoffa/prophetize:latest']
Cloud Run behind Google API Gateway
One of the main goals I had behind this project was to celebrate that Snowflake now supports external functions for GCP. Hence my choice to deploy on Cloud Run.
Now, to run external functions through GCP, we need to set up a connection from Snowflake to Google API Gateway, and from API Gateway to Cloud Run.
First we need a gateway.yaml for API Gateway to know that it will act as a proxy to the service we deployed on Cloud Run:
swagger: '2.0'
info:
  title: API Gateway config for Snowflake external function.
  description: This configuration file connects the API Gateway resource to the remote service (Cloud Run).
  version: 1.0.0
schemes:
  - https
produces:
  - application/json
paths:
  /test:
    post:
      summary: Prophetize
      operationId: prophetize
      x-google-backend:
        address: https://prophetize-zqnzinxyeq-wl.a.run.app/
        protocol: h2
      responses:
        '200':
          description: <DESCRIPTION>
          schema:
            type: string
Then you can follow the GCP docs to create an API Gateway with this configuration. Oh, and make sure to replace the values above with your own service URLs.
Snowflake to Google API Gateway
This is how I connected the dots on Snowflake, to create an integration with API Gateway:
use role accountadmin;
use schema temp.public;create or replace api integration prophet_test
    api_provider = google_api_gateway
    google_audience = 'test1-3s4aecfho43ih.apigateway.fhoffa.cloud.goog'
    api_allowed_prefixes = ('https://prophetize-4r3ddv95.wl.gateway.dev')
    enabled = true;

describe integration prophet_test;
create or replace external function prophetize(x string)
    returns variant
-- IMMUTABLE
    api_integration = prophet_test
    as 'https://prophetize-4r3ddv95.wl.gateway.dev/test' ;
grant usage on function prophetize(string) to role sysadmin;
And that’s all you need, now you can call the just minted prophetize() as in any other query in Snowflake:
select prophetize('[[41,43,62,43],["2019-12-30","2020-01-06","2020-01-13","2020-01-20"]]');Which gives results like:
[
  [
    "2020-01-21",
    51.3641167654911,
    40.85673826625397,
    61.745184538148166
  ],
  [
    "2020-01-22",
    51.72223221323965,
    41.87259513681375,
    61.29144225035811
  ],
  [
    "2020-01-23",
    52.0803476609882,
    41.66374622035821,
    61.55883149200517
  ], [...]
]
Securing the flows
You might have noticed many URLs in my configs above — now that you’ve seen them, you might want to start calling my functions from your accounts. That would be fine, but I’d rather protect them.
Snowflake makes this easy. Once you create the integration above, a service account for GCP will be automatically provisioned. You can get its value with describe integration prophet_test — and then use that service account to update the gateway.yaml so no one else can call it:
swagger: '2.0'
info:
  title: API Gateway config for Snowflake external function.
  description: This configuration file connects the API Gateway resource to the remote service (Cloud Function).
  version: 1.0.0
securityDefinitions:
  snowflakeAccess01:
    authorizationUrl: ""
    flow: "implicit"
    type: "oauth2"
    x-google-issuer: "ftyqmxcfyo@sfc-prod2-1-947.iam.gserviceaccount.com"
    x-google-jwks_uri: "https://www.googleapis.com/robot/v1/metadata/x509/ftyqmxcfyo@sfc-prod2-1-947.iam.gserviceaccount.com"
schemes:
  - https
produces:
  - application/json
paths:
  /test:
    post:
      summary: Prophetize.
      operationId: prophetize
      security:
        - snowflakeAccess01: []
      x-google-backend:
        address: https://prophetize-zqnzinxyeq-wl.a.run.app/
        protocol: h2
      responses:
        '200':
          description: <DESCRIPTION>
          schema:
            type: string
Then follow these Snowflake docs to update your GCP API Gateway with the above secured config.
Note that this GCP service account is provisioned by Snowflake regardless of what cloud you are using to host your Snowflake account. In this case I ran this whole demo on Snowflake on AWS, and it was able to call the GCP services effortlessly.
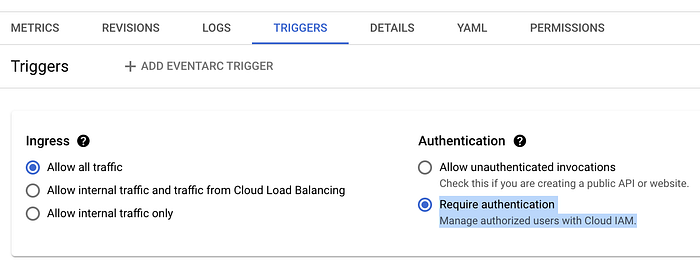
Meanwhile in Cloud Run, make sure to stop allowing unauthenticated invocations. With this only calls authorized through the API Gateway will be served:
Learn more
Facebook Prophet is a versatile tool with many levers and ways to tune:
Prophet is a procedure for forecasting time series data based on an additive model where non-linear trends are fit with yearly, weekly, and daily seasonality, plus holiday effects. It works best with time series that have strong seasonal effects and several seasons of historical data. Prophet is robust to missing data and shifts in the trend, and typically handles outliers well.
Read more from:
- “Seven Tips for Forecasting Cloud Costs (with FB’s Prophet)” from Gad Benram.
- “Building a serverless, containerized batch prediction model using Google Cloud Run, Pub/Sub, Cloud Storage and Terraform” by Sebastian Telsemeyer.
- Cloud Run costs and features, by Ahmet Alp Balkan
Next steps
- Try this out with a Snowflake free trial account — you only need an email address to get started.
- I shall set up a GitHub project with all these files (and update here when done)
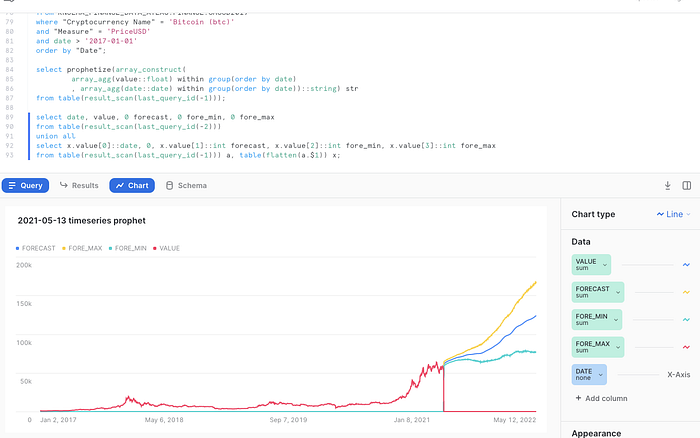
Play with Prophet: Bitcoin predictions
Knoema already has the valuation of multiple crypto coins in the Snowflake Marketplace, thus building a time series forecast with Prophet is straightforward:
-- define the time series
select "Value" value, "Date" date
from KNOEMA_FINANCE_DATA_ATLAS.FINANCE.CMCCD2019
where "Cryptocurrency Name" = 'Bitcoin (btc)'
and "Measure" = 'PriceUSD'
and date > '2017-01-01'
order by "Date";-- prophetize
select prophetize(array_construct(
        array_agg(value::float) within group(order by date)
        , array_agg(date::date) within group(order by date))::string) str
from table(result_scan(last_query_id(-1)));-- prepare the viz
select date, value, 0 forecast, 0 fore_min, 0 fore_max
from table(result_scan(last_query_id(-2)))
union all
select x.value[0]::date, 0, x.value[1]::int forecast, x.value[2]::int fore_min, x.value[3]::int fore_max
from table(result_scan(last_query_id(-1))) a, table(flatten(a.$1)) x;
The more you play with Prophet, the more you’ll see that the forecast will depend heavily on what values you feed it, and how you tune it. In this case, the forecasts varied widely depending on what starting date I used for the time series — starting in 2016 meant Prophet would observe a more complex pattern that feeding it data starting in 2018, and so forth.
Best part for me? I can pull all this off without leaving my comfy Snowflake SQL web UI:
Want more?
I’m Felipe Hoffa, Data Cloud Advocate for Snowflake. Thanks for joining me on this adventure. You can follow me on Twitter and LinkedIn, and check reddit.com/r/snowflake for the most interesting Snowflake news.

